Unplug the appliance before opening panels or reaching past the drum opening. Work only on the lint filter and its housing. Cabinet wiring, heater compartments, and hard-duct changes are outside DIY scope. If the filter frame is melted, if the housing is heat-discoloured, or if the dryer smells of scorch, stop and book service.
Identify Filter Type And Location
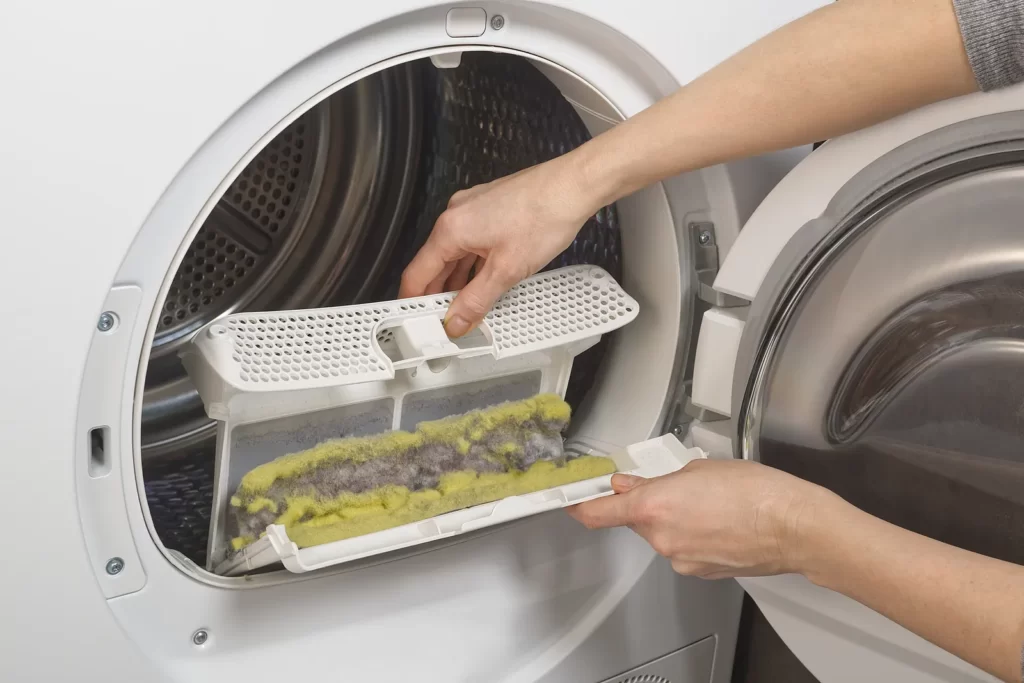
Most front-load dryers place the filter at the door opening; some designs position a slide-out cassette on the top panel. Check your model label and service manual so part numbers and dimensions match. A healthy filter sits flat in its cradle, locks positively, and presents an intact mesh. The typical polyester or nylon screen has fine apertures roughly half to one millimetre across. Warped frames lift at the corners and allow lint bypass; anything beyond about one millimetre of corner lift is grounds for replacement. If you see a grey blanket of fibres that feels felted rather than fluffy, residues of softener and detergent have bonded to the mesh and airflow is restricted even when “visibly clean.”
Clean Or Replace
Start at the drum opening. Withdraw the filter gently and note orientation. Roll lint off by hand; avoid washing first, because wet lint compacts in the weave. Hold the filter to a light source. Uniform light indicates open mesh; dim patches signal blockage. If residue remains, wash in warm water with a drop of mild detergent and a soft brush, rinse thoroughly, and let it dry fully. Do not use oils or silicone sprays; they attract lint and degrade plastics.
Inspect the housing with a flashlight. Fine lint accumulates in the cavity and the first bend of the internal duct. Vacuum with a narrow crevice tool while holding the blower intake closed with a card to prevent drawing debris deeper. Refit the dry filter and verify it seats flush with no rocking. If the mesh has tears, if the frame is cracked, or if the latch no longer retains firmly, install a new filter matched to the exact model. Avoid “close fit” generics: small dimension errors create bypass paths that load the blower and heater with lint.
After reassembly, run an empty timed-dry cycle for one minute. At the exterior cap you should feel a strong, even stream of air and see the flap open briskly. Weak flow after a serviced filter points to duct restriction rather than the filter itself.
Results, Benchmarks, And Stop Signals
A serviced filter restores the first choke point in the air path. Treat the following numbers as practical thresholds and confirm specifics in your service manual:
Normal: the screen shows uniform light transmission and lies flat; the latch engages positively. The felt “lint layer” after a typical load should peel off in a single sheet and measure well under a millimetre thick. Post-service airflow at the outlet should lift a lightweight tissue held five to eight centimetres from the cap and hold it there continuously.
Not normal: corner lift or frame warp around one millimetre or more; any mesh tear; latch that releases under a light tug; lint layer that mats into a felted sheet despite cleaning; outlet flap that barely opens or chatters. These conditions increase heater temperature, trip cut-outs, and shorten element and blower life.
Stop DIY and call a professional if the filter cavity shows heat marks, if the blower screams or rattles after you remove compacted lint, or if breakers trip during a test run. Do not operate without a filter “just to check airflow”; unfiltered fibres will load the blower wheel and the heater tunnel within minutes.
FAQ
How often should I clean the filter?
After every load. For households with heavy towel or pet-hair cycles, rinse the screen weekly to remove fabric-softener films.
My screen looks clean but airflow is weak—what now?
Hold it to a bright light. Dim patches mean bonded residue. Wash, fully dry, and retest. If light still looks patchy or the frame rocks, replace the filter and inspect the duct.
Can I wash the filter in the dishwasher?
No. High heat and aggressive jets warp frames and widen the mesh. Hand wash only, then air-dry.
Is a metal mesh upgrade worth it?
Only if it is an OEM part for your model. Finer aftermarket meshes increase pressure drop and can slow drying.
What if the dryer runs with the filter removed?
Do not run it. Operating without a filter allows lint to bypass directly to the blower and heater, creating noise, imbalance, and a heightened fire risk.
Sources
- Manufacturer Service Manual — Model-Specific. Filter part numbers, seating checks, airflow diagnostics, and duct routing.
- IEC 60335 Series — Household And Similar Electrical Appliances — Safety. Safety framework for appliance servicing and user-accessible parts.
- UL 2158 — Electric Clothes Dryers. Performance and safety requirements relevant to airflow, lint management, and thermal protection.


